Difference between revisions of "Adding Bezel Support"
Jump to navigation
Jump to search
| Line 15: | Line 15: | ||
*'''!!!IMPORTANT!!! This step is completely independent of the emulator!!!''' | *'''!!!IMPORTANT!!! This step is completely independent of the emulator!!!''' | ||
*You only need to have the image that you created on step 1 to know the correct ini coordinates. | *You only need to have the image that you created on step 1 to know the correct ini coordinates. | ||
| − | *For more details about the ini coordinates please read this: | + | *For more details about the ini coordinates please read this: [[Bezels]] |
*'''!!!WARNING!!! You should never adjust these coordinates to make the bezel "better fit" your gameplay area.''' | *'''!!!WARNING!!! You should never adjust these coordinates to make the bezel "better fit" your gameplay area.''' | ||
Latest revision as of 01:31, 15 October 2016
Contents
Step by Step Walkthrough
Part 1: Preliminary steps:
Make your bezel image
- The image must be saved as a png file.
- You can make it of any size (preferable on your monitor aspect ratio). The preferable resolution for sharing purposes is at least full hd (1920x1080).
- You should have a transparent area on the image that follows the game aspect ratio for the system in order to show the game not stretched.
- You should save and share the bezel image following this naming convention:
- Bezel - name of the author - aspect ratio.png
- For example: Bezel - bleasby - 16x9.png
- For information about which folder to save your bezel images please read this: [1]
Create the bezel ini coordinates file
- !!!IMPORTANT!!! This step is completely independent of the emulator!!!
- You only need to have the image that you created on step 1 to know the correct ini coordinates.
- For more details about the ini coordinates please read this: Bezels
- !!!WARNING!!! You should never adjust these coordinates to make the bezel "better fit" your gameplay area.
Find your bezel mode
- There are two options that you should use, normal or fixResMode.
- If your emulator window re-sizes the gameplay area when you drag the window with your mouse, you must use the normal mode, otherwise you must use the fixResode.
Find if you can isolate your gameplay area on the emulator
- The bezel code will try to hide the title bar, the menu bar and the borders of your emulator window. The aim is to have only the game area showing when your are in windowed mode.
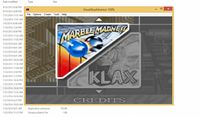
- Emulator with all windows components
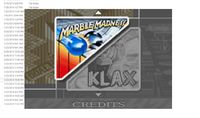
- Emulator with only the gameplay area
- However some emulators use custom window components and could not work with the default bezel commands for hiding window components.
- If the result emulator window are weird or have anything more than just the game area you should try to disable one by one the bezel commands to define which ones you could use. You can do that by adding the following module code lines either before the BezelStart() line or in the end of the module on the bezelLabel (to know more about it please read this: [2])
disableHideTitleBar := true
disableHideToggleMenu := true
disableHideBorder := true
- The result window components that cannot be hidden must be placed behind the bezel image. In order to do that we need to know how many pixels we need to hid behind the bezel image. These values will be used to set the bezelScreenOffset values in step 9 if necessary.
Once all this is done, we can finally start to make the module code changes to add bezel support.
Part 2: Module Code:
BezelGUI()
- The BezelGUI() function call must be placed between the StartModule() and the FadeInStart() lines of your module code.
- This line is required to Bezel work.
BezelStart()
- If you have identified that the emulator requires the normal mode on step 3, use the line: BezelStart()
- If you have identified that the emulator requires the fixResMode mode on step 3, use the line: BezelStart("fixResMode")
- This line must be placed after the line on the module that reads the full screen definition.
- For example:
StartModule()
BezelGUI()
FadeInStart()
settingsFile := modulePath . "\" . moduleName . ".ini"
Fullscreen := IniReadCheck(settingsFile, "Settings", "Fullscreen","true",,1)
BezelStart("fixResMode")[/CODE]
- This line is required to Bezel work.
BezelDraw()
- The BezelDraw() function call must be placed just before the FadeInExit() line of your module code.
- This line is required to Bezel work.
BezelExit()
- The BezelExit() function call must be placed between the 7zCleanUp() and the FadeOutExit() lines of your module code.
- This line is required to Bezel work.
Part 3: Extra Steps, only if necessary:
Using the bezel screen offsets:
- In step 4 you identified if the gameplay area could be isolated automatically or not on the emulator screen. If you cannot do it with the bezel built-in code you will need to set the bezelScreenOffset values.
- These values determines how many pixels of the emulator window should be placed behind of the bezel image on each of the sides.
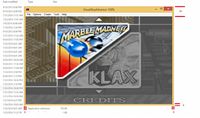
- For example, if you have this result on the step 4:
You should add this code on the emulator module before the BezelStart() line:
bezelTopOffset := IniReadCheck(settingsFile, "Settings", "Bezel_Top_Offset","45",,1)
bezelBottomOffset := IniReadCheck(settingsFile, "Settings", "Bezel_Bottom_Offset","8",,1)
bezelRightOffset := IniReadCheck(settingsFile, "Settings", "Bezel_Right_Offset", "8",,1)
bezelLeftOffset := IniReadCheck(settingsFile, "Settings", "Bezel_Left_Offset", "8",,1)
BezelStart()
- Warning!!! Hiding the windows components is always preferable than using the screen offset values because of compatibility between different computers and windows themes. Only use the screen offsets if you are not able to hide the emulator window components by other means.
Adding support for vertical bezels:
- If your system has vertical and horizontal games you should add to your module code the definition if the game is a vertical one by adding the below variable declaration before the bezelStart line whenever the game should use a vertical oriented bezel image:
vertical := "true" ; if the game has vertical orientation
Bezel on full screen mode for fixResMode
- The bezel code automatically switches your emulator to work on windowed mode. However, if you must to use the fixResMode and want to draw a bezel around your gameplay area using the most of your monitor screen, you are going to need to try to draw the bezel image above the game when the emulator is on full screen. mode.
- This is useful when you have to use the fixResMode and want to maximize the gameplay area. However be warned that most emulators will not allow RocketLauncher to draw its bezel above their screens.
- To add support for this you should replace the bezelStart("fixResMode) line for something similar to the code bellow:
- Replace this:
BezelStart("fixResMode")
- For this:
If bezelEnabled
{
    If (Fullscreen = "true") {
        disableForceFullscreen := true
        disableWinMove := true
        disableHideTitleBar := true
        disableHideToggleMenu := true
        disableHideBorder := true
        BezelStart()
    } Else {
        BezelStart("fixResMode")
    }
}


