Bezels
Jump to navigation
Jump to search
RocketLauncher allows you to show a Bezel Image around the game during gameplay. 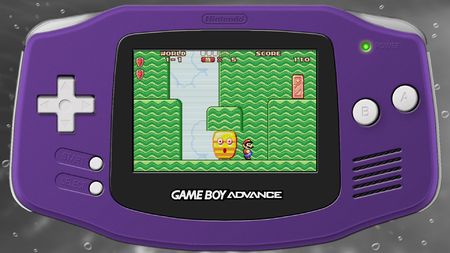
Multi-Emulator Bezels:
- To enable the Bezel you just need to set the ini key Bezel_Enabled to true of your "Global RocketLauncher.ini" file in the [Bezel] section, or just check them in the RocketLauncherUI.
- You can enable these options on a per-system basis if you want different configurations to different systems. Just edit the system corresponding "RocketLauncher.ini" file or check them in the system section of RocketLauncherUI.
Requirements:
- Emulator module compatibility:
- The emulator's module must contain RocketLauncher bezel functions calls.
- In the bottom of this page, you can find the list of compatible emulators so far.
- A Bezel Image file:
- You need to have a bezel png (gif, tif, bmp or jpg) image in the bezel path folder with the file name beginning with "bezel". For example "Bezel RocketLauncher Default.png".
- The default folder where the bezel images are located are in the RocketLauncher Media folder.
- You can show a bezel image specific to each game by naming it after the rom name and placing it at the system folder bezel media path.
- .\Media\Bezels\MAME\TMNT\Bezel*.png
- If no rom bezel file is found, RocketLauncher will look for a system bezel image. If your emu has different game orientations (ex: MAME and Nintendo DS systems), HL will look for the bezel image at the folder with the oreientation aname on it, for example:
- For Vertical Games:
- .\Media\Bezels\MAME\_Default\Vertical\Bezel*.png
- For Horizontal Games:
- .\Media\Bezels\MAME\_Default\Horizontal\Bezel*.png
- if the orientation specific bezel is not found, HL will search for the bezel image at the system default folder:
- .\Media\Bezels\MAME\_Default\Bezel*.png
- if the system bezel is not found, HL will search for the global Bezel image defined at:
- .\Media\Bezels\_Default\Bezel*.png
- If neither of the above files are found, HL will start the game with the emulator normal screen.
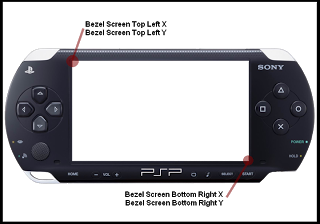
- An ini bezel image file:
- Every bezel image should be accompanied by a ini file with the same file name containing info about the location to place the game window relative to the bezel image.
- If you don't have this file, the ini file will be created with your screen dimensions on the first time that you run the bezel in RocketLauncher. You should change its value to the coordinates defined on the ini file to represent the pixels coordinates of your bezel image of the top left and bottom right screen edges.
- These coordinates can be found by opening the image in Paint, zooming in, and putting the mouse at the top left corner of the transparent area and read the coordinates in the bottom left of the window. Repeat for the bottom right corner as well.
[General]
Bezel Screen Top Left X Coordinate=448
Bezel Screen Top Left Y Coordinate=344
Bezel Screen Bottom Right X Coordinate=1110
Bezel Screen Bottom Right Y Coordinate=798
Additional Features:
- Random Bezels:
- If you have more than one file starting with "bezel" in the same folder, RocketLauncher will choose a random bezel on each game's launch.
- Bezel Background:
- RocketLauncher will search for a background image to be drawn below the emulator window and the bezel image. This search is independent of the bezel image search, so you can have only one background defined to all your Nintendo DS games, and at the same time have different bezel images for each rom of the system.
- RocketLauncher will search for any png (gif, tif, bmp or jpg) image file beginning with the word Background to use as the bezel background. If more than one background file is found at the same folder, RocketLauncher will choose aleatory which one to use at each game section start
- The folders order to be searched is the same as the bezel image locations explained before:
- .\Media\Bezels\Nintendo DS\Super Mario\Background*.png
- .\Media\Bezels\Nintendo DS\_Default\Vertical\Background*.png or .\Media\Bezels\Nintendo DS\_Default\Horizontal\Background*.png
- .\Media\Bezels\Nintendo DS\_Default\Background*.png
- .\Media\Bezels\_Default\Background*.png
- Bezel Overlay:
- Some emulators allow an overlay to be drawn above the game screen. RocketLauncher will search for an overlay image to be drawn above the emulator window and the bezel image at the same folder that it found the bezel image being used.
- For example, if the bezel image was found at a rom named folder, the overlay should be in the same folder like:
- .\Media\Bezels\Nintendo DS\Super Mario\Bezel*.png
- .\Media\Bezels\Nintendo DS\Super Mario\Overlay*.png
- RocketLauncher will search for any png image file beginning with the word Overlay to use as the Overlay image. If more than one overlay file is found in the same folder, RocketLauncher will choose a random one on each game's launch.
- Some emulators have a link feature that emulates the actual console's ability to do multiple players via multiple consoles, GBA is a good example of this. A bezel can be created to wrap itself around all instances of the emulator to give a nice finished look. You can find information about how to make this work here: forum link
Module Requirements to make RocketLauncher Bezel work:
- You need to add 4 lines to your module to make bezel work:
- Bezel GUI should be in the modules that want to support the bezel between StartModule() and FadeInStart() lines.
BezelGUI()
- Bezel Start should be in the modules that want to support the bezel just after FadeInStart().
BezelStart()
- BezelDraw should be just after WinWaitActive line of the emu.
BezelDraw()
- BezelExit should be before FadeOutExit line.
BezelExit()
- 2. The BezelLabel:
- Some emulators will need more specific commands to hide any window component that gets above the bezel image.
- By default bezel tries to remove the window border, title and menu components. If you want to disable some or all of these commands you just need to add a disable line to it.
- You can place any of these commands in a Bezel label named BezelLabel at the end of your module code.
- For example, add this to the last line of your module code to disable the title bar, border and menu option hiding commands of the emulator window:
BezelLabel:
disableHideTitleBar := true
disableHideToggleMenu := true
disableHideBorder := true
disableWinMove := true
return
- 3. The Bezel offset variables:
- If your emulator does not allow you to hide all of its window components it is necessary to define a slight different window location so the bezel screen is able to only show the game window without any additional unwanted graphics.
- You can do that very easily by simply editing the bezel offset values in pixels at the beginning of your module options in RocketLauncherUI.
PokeMini example:
bezelTopOffset := 37
bezelBottomOffset := 16
bezelLeftOffset := 16
bezelRightOffset := 16
The Bezel Mode Types:
- Normal Mode:
- The normal mode should be used when the emulator allows the game to change the resolution whenever you resize its windows
- In this mode the bezel image will be scaled, maintaining its aspect ratio, to fill your screen resolution. The game window will be resized to fit the screen gap on your bezel image defined at your bezel.ini file.
- To use the normal mode just place the bezel function lines at your emulator module without any parameters defined.
BezelGUI()
BezelStart()
BezelDraw()
BezelExit()
- 2. Fix Resolution Mode:
- The fix resolution mode is used when the emulator does not allow the game to be resized according the window size. That means, when the game is presented always at a fixed resolution configured at the emulator.
- In this mode the game window will be moved to the screen center and the bezel image will be draw around it so the screen gap corresponds to the fixed game window resolution. Any parts of the bezel image that does not fit the screen will be cropped in this mode.
- To use the fix resolution mode you just need to add to the BezelStart function line in your module the parameter "fixResMode".
BezelGUI()
BezelStart("fixResMode")
BezelDraw()
BezelExit()
- 3. Layout File Mode:
- The layout file mode will disable the Rocketlauncher bezel feature whenever you have a valid .lay file for the game in MAME and it will use the built-in MAME bezel feature instead for this game.
- When no valid .lay file is founf, RocketLauncher will use its bezel feature whenever you have a valid bezel image on RocketLauncher\Media\Bezel folders.
- To use the layout file mode you just need to add to the BezelStart function line in your module the romName, for the case of MAME, or the system name, for the case of MESS. Additional info should be passed to the function about the game aspect ratio, screen rotation and parent rom of the current rom.
MAME:
BezelGUI()
BezelStart(romName,parent,angle,width,height)
BezelDraw()
BezelExit()
MESS:
BezelGUI()
BezelStart(ident,parent,angle,width,height)
BezelDraw()
BezelExit()