Difference between revisions of "Instruction Cards Guide"
(Created page with "=What are Instruction Cards?= Instruction Cards are images containing gameplay info, player moves, curiosity, hints, controller buttons or anything else that you want to be d...") |
|||
| (16 intermediate revisions by the same user not shown) | |||
| Line 1: | Line 1: | ||
=What are Instruction Cards?= | =What are Instruction Cards?= | ||
| − | Instruction Cards are images containing gameplay info, player moves, curiosity, hints, controller buttons or anything else that you want to be displayed while you are playing the game, without the need to pause or stop your gameplay. | + | Instruction Cards are images containing gameplay info, player moves, curiosity, hints, controller buttons, or anything else that you want to be displayed while you are playing the game, without the need to pause or stop your gameplay. |
| − | + | ::[[Image:IC_example.jpg|link=]] | |
| − | |||
| − | |||
==Quick User Guide== | ==Quick User Guide== | ||
===Requirements=== | ===Requirements=== | ||
| − | #RocketLauncher | + | #RocketLauncher is required to use this feature. It is strongly recommended to update your RocketLauncher files to the last version available. Perform an update in RocketLauncherUI to grab the latest files. |
| − | #The instruction cards will only be displayed if you have a bezel image set and correctly displaying for the game. Therefore it is required to have bezels working | + | #The instruction cards will only be displayed if you have a bezel image set and correctly displaying for the game. Therefore it is required to have bezels working first. |
| − | + | #:'''Warning: This will only work well on emulators that support the bezel [[normal mode]].''' | |
| − | + | #You need to have at least one Instruction Card image in the RocketLauncher media bezel folder. | |
| − | Warning: This will only work well on emulators that | + | #*It is possible to show an instruction cards image without showing a bezel by using a fake fullscreen bezel. Just enable this setting in RLUI. Do not forget to turn it off though as it can conflict with real bezels if you decide to use them: |
| − | #You need to have at least one Instruction Card image | + | [[Image:RLUI_fakefullscreenbezel.PNG|thumb|none]] |
| − | + | ||
| − | Mmg1design also did very nice ICs for a series of games. Just check his work on his | + | ===Getting Started=== |
| − | In the future the Instruction Cards available will be all concentrated at the same place as the bezel images (on the ftp). More instructions about it will be given when possible. | + | To get started, this file include an IC example made to work on MAME Street Fighter 2 game (sf2) and Neo Geo games to your RocketLauncher folder. The files are in the attached zip file named ICS example files (thks to manson and thooperman for the artwork provided). |
| + | Mmg1design also did very nice ICs for a series of games. Just check his work on his [http://www.mmg1.info/blog/instruction-cards-for-mortal-kombat-and-other-arcade-titles/ homepage]. | ||
| + | In the future, the Instruction Cards available will be all concentrated at the same place as the bezel images (on the emumovies ftp). More instructions about it will be given when possible. | ||
#You need to set you preferred instruction cards control method on RocketLauncherUI. There are three options available for that: | #You need to set you preferred instruction cards control method on RocketLauncherUI. There are three options available for that: | ||
| − | ##The Instruction Cards Left and Right Menus | + | ##The Instruction Cards Left and Right Menus |
##The Active Instruction Card Method | ##The Active Instruction Card Method | ||
##The Individual Instruction Cards Method | ##The Individual Instruction Cards Method | ||
| Line 25: | Line 25: | ||
===Instruction Card Control Methods=== | ===Instruction Card Control Methods=== | ||
#The Instruction Cards Left and Right Menus: | #The Instruction Cards Left and Right Menus: | ||
| + | #:IMAGE Name: IC Menus.jpg | ||
| + | #:You can set two keys to show and hide the ICs menus. | ||
| + | #:The ICs menus are controlled by the navigation keys defined by player one (left menu) and two (right menu) on RocketLauncherUI. | ||
| + | #:[[Image:IC_playerkeys.png|thumb|none]] | ||
| + | #:Each menu can control one, two, or the eight possible display positions for ICs. The default values are set for the left menu to control the topLeft|bottomLeft|leftCenter|bottomCenter positions and the right menu controls the topRight|bottomRight|topCenter|rightCenter positions to mimic the one and two players independent ICs choices. You can change that the way you like on RocketLauncherUI options. | ||
| + | #:Pressing the left or right navigation keys changes the current IC position being controlled by the instruction cards menu. | ||
| + | #The Active Instruction Card Method: | ||
| + | #:In this method you define one key to change between the selected screen positions where you will change the instruction card, and other two keys to select the next or previous instruction card. | ||
| + | #The Individual Instruction Cards Method: | ||
| + | #:In this method you select one key for each of the eight possible ICs positions. | ||
| + | '''TIP:''' | ||
| + | *It is recommended to use the ICs menu method as the default one, as it provides control to multiple ICs shown at the same time on screen with the least amount possible of dedicated keyboard keys. | ||
| + | <br><br> | ||
| + | <span style="font-size: 200%;">'''Just play the game and hit your IC key!!!!'''</span> | ||
| − | + | ==Options Guide - Understanding The Instruction Cards Features== | |
| − | + | #Instruction Cards Screen Positions: | |
| − | + | #:Instruction Cards can be displayed on eight different screen positions: topLeft|topRight|bottomLeft|bottomRight|topCenter| leftCenter|rightCenter|bottomCenter | |
| − | + | #:IMAGE Name: Screen Positions.jpg | |
| − | + | #Instruction Cards Scale: | |
| − | + | #:Instruction Cards can be scaled automatically by the RocketLauncher code with the built-in options: ScreenHeight (default, the IC height is scaled to fit the screen height keeping the image aspect ratio. This is a good setup for two player games like street fighter), ScreenWidth, HalfScreenHeight, HalfScreenWidth, OneThirdScreenHeight and OneThirdScreenWidth. You can also choose a number factor to resize your instruction cards. | |
| − | + | #:Screen Height Scale: | |
| − | + | #:IMAGE Name: ScreenHeight.jpg | |
| − | + | #:Half Screen Height Scale: | |
| − | + | #:IMAGE Name: HalfScreenHeight.jpg | |
| − | + | #:One Third Screen Height Scale: | |
| − | + | #:IMAGE Name: OneThirdScreenHeight.jpg | |
| − | + | #Instruction Cards image transitions: | |
| − | + | #:You can choose different transition effects when changing from one instruction card to another. Options are fade, slide in, and slideOutandSlideIn. | |
| − | + | #Instruction Cards sound transitions: | |
| − | + | #:A sound transition can be also enabled. For more info on how to use mp3 files for sound transitions please read the RocketLauncherUI help tooltips. | |
| − | + | #Instruction Cards displayed on game startup: | |
| − | + | #:You can choose to show an instruction card automatically at the game start. The instruction card can be displayed in their normal order or be chosen randomly. | |
| − | + | #Random Instruction Cards Slide Show: | |
| − | + | #:You can set a timer that will change your instruction cards randomly at a certain amount of time. This is useful for toggling between special tips or game info while in gameplay automatically. | |
| − | |||
| − | |||
| − | |||
| − | |||
| − | |||
| − | |||
| − | |||
| − | ==Options Guide== | ||
| − | |||
| − | |||
| − | |||
| − | |||
| − | Instruction Cards can be displayed on eight different screen positions: topLeft|topRight|bottomLeft|bottomRight|topCenter| leftCenter|rightCenter|bottomCenter | ||
| − | |||
| − | IMAGE Name: Screen Positions.jpg | ||
| − | |||
| − | |||
| − | |||
| − | Instruction Cards can be scaled automatically by the RocketLauncher code with the built-in options: ScreenHeight (default, the IC height is scaled to fit the screen height keeping the image aspect ratio. This is a good setup for two | ||
| − | |||
| − | Screen Height Scale: | ||
| − | |||
| − | IMAGE Name: ScreenHeight.jpg | ||
| − | |||
| − | Half Screen Height Scale: | ||
| − | |||
| − | IMAGE Name: HalfScreenHeight.jpg | ||
| − | |||
| − | One Third Screen Height Scale: | ||
| − | |||
| − | IMAGE Name: OneThirdScreenHeight.jpg | ||
| − | |||
| − | |||
| − | |||
| − | You can choose different transition effects when changing from one instruction card to another. Options are fade, slide in, and slideOutandSlideIn. | ||
| − | |||
| − | |||
| − | |||
| − | A sound transition can be also enabled. For more info on how to use mp3 files for sound transitions please read the RocketLauncherUI help tooltips. | ||
| − | |||
| − | |||
| − | |||
| − | You can choose to show an instruction card automatically at the game start. The instruction card can be displayed in their normal order or be chosen randomly. | ||
| − | |||
| − | |||
| − | |||
| − | You can set a timer that will change your instruction cards randomly at a certain amount of time. This is useful for toggling between special tips or game | ||
| − | |||
| − | |||
| − | |||
| − | |||
| − | |||
| − | |||
| − | |||
| − | |||
| − | |||
| − | |||
| + | ==Advanced User Guide - Creating Instruction Cards== | ||
| + | #The first step is to have an instruction card image in png format. | ||
| + | #:The second and most important step is understanding the file naming convention on ICs. It is possible to define various options on the instruction cards file names in order to make it work in any computer setup by simply coping the images from one computer to another. So let's start with explaining the naming convention. | ||
===Instruction Cards Naming Convention=== | ===Instruction Cards Naming Convention=== | ||
| − | "Instruction Card - {Unique Description [{Seq#}]} - ({creator}) [{Position}] [{Scale}].png" | + | "<span style="color: green;font-size: 100%;">Instruction Card</span> - {'''Unique Description''' [{Seq#}]} - ({creator}) [{'''Position'''}] [{'''Scale'''}].png" |
| − | The values in [ ] are optional. | + | *The values in [ ] are optional. |
| − | The values in green are required | + | *The values in <span style="color: green;font-size: 100%;">green</span> are required. |
| − | The values in bold are recommended. | + | *The values in '''bold''' are recommended. |
| − | + | <br> | |
| − | + | '''Explanation of each field:''' | |
| − | "Instruction Card" - Required. Any Instruction Card should begin its file name by this exact word in order to make RocketLauncher know that it is dealing with an Instruction Card. | + | *"<span style="color: green;font-size: 100%;">Instruction Card</span>" - Required. Any Instruction Card should begin its file name by this exact word in order to make RocketLauncher know that it is dealing with an Instruction Card. |
| − | {Unique Description} - IC descriptive name. It is better to include a small descriptive name of the contents of the IC, like the fighter name, hints, controls,... This description will be the main part of the name | + | *{'''Unique Description'''} - IC descriptive name. It is better to include a small descriptive name of the contents of the IC, like the fighter name, hints, controls,... This description will be the main part of the name shown on the ICs menu. |
| − | [{Seq#}] - Optional. If the same fighter has more than one IC, just add a number, letter or anything else, keeping the unique description unchanged to make the ICs for the fighter to appear in sequence. | + | *[{Seq#}] - Optional. If the same fighter has more than one IC, just add a number, letter or anything else, keeping the unique description unchanged to make the ICs for the fighter to appear in sequence. |
| − | [{Position}] - Optional. Determines the screen position were the IC will be | + | *[{'''Position'''}] - Optional. Determines the screen position were the IC will be shown. Can be: topLeft|topRight|bottomLeft|bottomRight|topCenter| leftCenter|rightCenter|bottomCenter |
| − | [{Scale}] - Optional. Determines the scale to be applied to the IC image. Can be: ScreenHeight, ScreenWidth, HalfScreenHeight, HalfScreenWidth, OneThirdScreenHeight and OneThirdScreenWidth. | + | *[{'''Scale'''}] - Optional. Determines the scale to be applied to the IC image. Can be: ScreenHeight, ScreenWidth, HalfScreenHeight, HalfScreenWidth, OneThirdScreenHeight and OneThirdScreenWidth. |
| − | ({creator}) - You can write anything inside the parenthesis. This info will not appear on the IC menus to avoid cluttering. The author name is required on this field. | + | *({creator}) - You can write anything inside the parenthesis. This info will not appear on the IC menus to avoid cluttering. The author name is required on this field. |
| − | |||
| − | |||
| − | |||
| − | |||
| − | |||
| − | |||
| − | |||
| − | |||
| − | |||
| − | |||
| − | |||
| − | |||
| − | |||
| − | |||
| − | |||
| − | |||
| − | |||
| − | |||
| − | |||
| − | |||
| − | |||
| − | |||
| − | |||
| − | |||
| − | |||
| − | |||
| − | |||
| − | |||
| − | |||
| − | |||
| − | |||
| − | |||
| − | |||
| − | |||
| − | |||
| − | |||
| − | |||
| − | |||
| − | |||
| − | |||
| − | |||
| − | |||
| − | |||
| − | |||
| − | |||
| − | |||
| − | |||
| − | |||
| − | |||
| − | |||
| − | |||
| − | |||
| − | |||
| − | |||
| − | |||
| − | |||
| − | |||
| − | |||
| − | |||
| − | |||
| − | |||
| − | |||
| − | |||
| + | ===Example 1: Instruction Card Position=== | ||
| + | Instruction Card - Ryu 1 - (bleasby) leftCenter.png | ||
| + | Instruction Card - Ryu 2 - (bleasby) leftCenter.png | ||
| + | Instruction Card - Ken - (bleasby) leftCenter.png | ||
| + | *On these examples only the leftCenter word would really be optional, but it is better to have it, so you should add it to the file name whenever it is possible. | ||
| + | *This instruction card will be only displayed on the Left side of your screen, centered on the screen height. | ||
| − | The instruction | + | ===Example 2: Instruction Card Scale=== |
| + | *In our previous example, as you can see, we did not define the Scale option on the instruction card file name. Therefore, the instruction card will be scaled using the default value determined on RocketLauncherUI. The initial default value for the scale option is ScreenHeight, therefore, the IC image will be resized, keeping its aspect ratio, to fill the user screen height. This is a very good setup if you want to show only one instruction card each time on the side of the screen. If you want to have an IC with half of the screen height displayed, just add to the file name the special word "HalfScreenHeight", like in the following example: | ||
| + | Instruction Card - Ryu 1 - (bleasby) leftCenter HalfScreenHeight.png | ||
| + | *Just like the positions (that can be defined through adding specific words to the file name like leftCenter, rightCenter, and so on), the IC can be also scaled automatically by the bezel code to adjust to different screen resolutions based on special file name keywords, as can be seen in the example above. | ||
| + | *These keywords are: '''ScreenHeight''', '''ScreenWidth''', '''HalfScreenHeight''', '''HalfScreenWidth''', '''OneThirdScreenHeight''' and '''OneThirdScreenWidth'''. | ||
| + | *If you want to display the IC with a different proportion not defined on the ICS scale options (for example taking 80% of the screen height), just add some transparent area to the sides of your ICs image and try to use the default screenHeight scale whenever it’s possible. | ||
| − | IC | + | ===Example 3: Multiple Players/Positions Instruction Cards=== |
| − | + | :'''Two Players Example:''' | |
| − | + | *If the game supports two simultaneous players and the same IC could be used for both, just add the leftCenter and RightCenter positions on the same file name, and it will be used for the two players. | |
| − | + | *For example: | |
| + | Instruction Card - Ryu 1 - (bleasby) leftCenter rightCenter.png | ||
| + | Instruction Card - Ryu 2 - (bleasby) leftCenter rightCenter.png | ||
| + | Instruction Card - Ken - (bleasby) leftCenter rightCenter.png | ||
| + | :'''Four Players Example:''' | ||
| + | *If the game supports four players, just add the topLeft,bottomLeft,topRight,bottomRight to be able to show four ICs at the same time on screen. | ||
| + | *For example: | ||
| + | Instruction Card - Thor - (bleasby) topLeft bottomLeft topRight bottomRight.png | ||
| + | *To show four ICs at the same time on screen, set each of them to just use half of the screen height: | ||
| + | Instruction Card - Thor - (bleasby) topLeft bottomLeft topRight bottomRight HalfScreenHeight.png | ||
| + | *This way things will be plug and play for all users. | ||
| − | + | ===Instruction Cards Menu Names=== | |
| − | The | + | *The ICs file name will define the name to be displayed on the menu. |
| + | *The bezel code will remove from the file name the word "Instruction Card", anything inside parenthesis, the position words (leftCenter, rightCenter,...) and the scale words (HalfScreenWidth,...). Everything else on the file name will be used as the instruction card name, so if you have this file name: | ||
| + | Instruction Card - Ryu 1 - (bleasby) leftCenter.png | ||
| + | *The red parts will be removed: | ||
| + | <span style="color: red;font-size: 100%;">Instruction Card</span> - Ryu 1 - <span style="color: red;font-size: 100%;">(bleasby) leftCenter</span> | ||
| + | *And you will get this as the menu name: | ||
| + | - Ryu 1 - | ||
| + | <br> | ||
| + | '''IMPORTANT:''' | ||
| + | *If no position special word is added to the instruction card file name, RocketLauncher will consider that the Instruction card should be shown in all positions defined on the RocketLauncherUI, general settings, positions option. | ||
| − | + | ==Advanced User Guide - Customizing The Instruction Cards Menu== | |
| + | *The instruction cards menus are defined by four files: | ||
| + | **'''IC Menu Left.png''' - Background image of the IC left menu | ||
| + | **'''IC Menu Left.ini''' - Options that define the ICs names list to be shown on the left menu | ||
| + | **'''IC Menu Right.png''' - Background image of the IC right menu | ||
| + | **'''IC Menu Right.ini''' - Options that define the ICs names list to be shown on the right menu | ||
| − | RocketLauncher will filter out from the possible selection any screen position that does not have at least one instruction card to be | + | *You can simply create a new background file for the ICs menu, or edit the ini files to change the font and location appearance. |
| + | *The ini file has two main sections, the list settings ([Instruction Card List Settings]), which defines the list font, colors, size and position appearance options, and the text screen position ([Instruction Card Screen Position Text Settings]) that defines the text that shows the current selected IC position. | ||
| + | *In RocketLauncherUI you can also control the number of items listed at the same time on the ICs menu (7 ICs is the default number of items shown on the list), and the positions that will be controlled by each IC menu. | ||
| + | *RocketLauncher will filter out from the possible selection, any screen position that does not have at least one instruction card to be shown. | ||
Latest revision as of 06:10, 29 January 2016
Contents
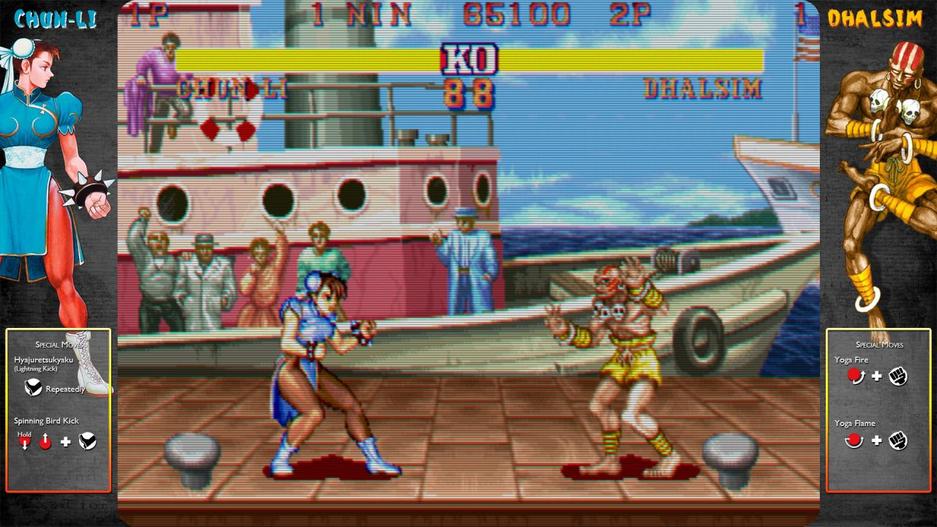
What are Instruction Cards?
Instruction Cards are images containing gameplay info, player moves, curiosity, hints, controller buttons, or anything else that you want to be displayed while you are playing the game, without the need to pause or stop your gameplay.
Quick User Guide
Requirements
- RocketLauncher is required to use this feature. It is strongly recommended to update your RocketLauncher files to the last version available. Perform an update in RocketLauncherUI to grab the latest files.
- The instruction cards will only be displayed if you have a bezel image set and correctly displaying for the game. Therefore it is required to have bezels working first.
- Warning: This will only work well on emulators that support the bezel normal mode.
- You need to have at least one Instruction Card image in the RocketLauncher media bezel folder.
- It is possible to show an instruction cards image without showing a bezel by using a fake fullscreen bezel. Just enable this setting in RLUI. Do not forget to turn it off though as it can conflict with real bezels if you decide to use them:

Getting Started
To get started, this file include an IC example made to work on MAME Street Fighter 2 game (sf2) and Neo Geo games to your RocketLauncher folder. The files are in the attached zip file named ICS example files (thks to manson and thooperman for the artwork provided). Mmg1design also did very nice ICs for a series of games. Just check his work on his homepage. In the future, the Instruction Cards available will be all concentrated at the same place as the bezel images (on the emumovies ftp). More instructions about it will be given when possible.
- You need to set you preferred instruction cards control method on RocketLauncherUI. There are three options available for that:
- The Instruction Cards Left and Right Menus
- The Active Instruction Card Method
- The Individual Instruction Cards Method
Instruction Card Control Methods
- The Instruction Cards Left and Right Menus:
- IMAGE Name: IC Menus.jpg
- You can set two keys to show and hide the ICs menus.
- The ICs menus are controlled by the navigation keys defined by player one (left menu) and two (right menu) on RocketLauncherUI.
- Each menu can control one, two, or the eight possible display positions for ICs. The default values are set for the left menu to control the topLeft|bottomLeft|leftCenter|bottomCenter positions and the right menu controls the topRight|bottomRight|topCenter|rightCenter positions to mimic the one and two players independent ICs choices. You can change that the way you like on RocketLauncherUI options.
- Pressing the left or right navigation keys changes the current IC position being controlled by the instruction cards menu.
- The Active Instruction Card Method:
- In this method you define one key to change between the selected screen positions where you will change the instruction card, and other two keys to select the next or previous instruction card.
- The Individual Instruction Cards Method:
- In this method you select one key for each of the eight possible ICs positions.

TIP:
- It is recommended to use the ICs menu method as the default one, as it provides control to multiple ICs shown at the same time on screen with the least amount possible of dedicated keyboard keys.
Just play the game and hit your IC key!!!!
Options Guide - Understanding The Instruction Cards Features
- Instruction Cards Screen Positions:
- Instruction Cards can be displayed on eight different screen positions: topLeft|topRight|bottomLeft|bottomRight|topCenter| leftCenter|rightCenter|bottomCenter
- IMAGE Name: Screen Positions.jpg
- Instruction Cards Scale:
- Instruction Cards can be scaled automatically by the RocketLauncher code with the built-in options: ScreenHeight (default, the IC height is scaled to fit the screen height keeping the image aspect ratio. This is a good setup for two player games like street fighter), ScreenWidth, HalfScreenHeight, HalfScreenWidth, OneThirdScreenHeight and OneThirdScreenWidth. You can also choose a number factor to resize your instruction cards.
- Screen Height Scale:
- IMAGE Name: ScreenHeight.jpg
- Half Screen Height Scale:
- IMAGE Name: HalfScreenHeight.jpg
- One Third Screen Height Scale:
- IMAGE Name: OneThirdScreenHeight.jpg
- Instruction Cards image transitions:
- You can choose different transition effects when changing from one instruction card to another. Options are fade, slide in, and slideOutandSlideIn.
- Instruction Cards sound transitions:
- A sound transition can be also enabled. For more info on how to use mp3 files for sound transitions please read the RocketLauncherUI help tooltips.
- Instruction Cards displayed on game startup:
- You can choose to show an instruction card automatically at the game start. The instruction card can be displayed in their normal order or be chosen randomly.
- Random Instruction Cards Slide Show:
- You can set a timer that will change your instruction cards randomly at a certain amount of time. This is useful for toggling between special tips or game info while in gameplay automatically.
Advanced User Guide - Creating Instruction Cards
- The first step is to have an instruction card image in png format.
- The second and most important step is understanding the file naming convention on ICs. It is possible to define various options on the instruction cards file names in order to make it work in any computer setup by simply coping the images from one computer to another. So let's start with explaining the naming convention.
Instruction Cards Naming Convention
"Instruction Card - {Unique Description [{Seq#}]} - ({creator}) [{Position}] [{Scale}].png"
- The values in [ ] are optional.
- The values in green are required.
- The values in bold are recommended.
Explanation of each field:
- "Instruction Card" - Required. Any Instruction Card should begin its file name by this exact word in order to make RocketLauncher know that it is dealing with an Instruction Card.
- {Unique Description} - IC descriptive name. It is better to include a small descriptive name of the contents of the IC, like the fighter name, hints, controls,... This description will be the main part of the name shown on the ICs menu.
- [{Seq#}] - Optional. If the same fighter has more than one IC, just add a number, letter or anything else, keeping the unique description unchanged to make the ICs for the fighter to appear in sequence.
- [{Position}] - Optional. Determines the screen position were the IC will be shown. Can be: topLeft|topRight|bottomLeft|bottomRight|topCenter| leftCenter|rightCenter|bottomCenter
- [{Scale}] - Optional. Determines the scale to be applied to the IC image. Can be: ScreenHeight, ScreenWidth, HalfScreenHeight, HalfScreenWidth, OneThirdScreenHeight and OneThirdScreenWidth.
- ({creator}) - You can write anything inside the parenthesis. This info will not appear on the IC menus to avoid cluttering. The author name is required on this field.
Example 1: Instruction Card Position
Instruction Card - Ryu 1 - (bleasby) leftCenter.png
Instruction Card - Ryu 2 - (bleasby) leftCenter.png
Instruction Card - Ken - (bleasby) leftCenter.png
- On these examples only the leftCenter word would really be optional, but it is better to have it, so you should add it to the file name whenever it is possible.
- This instruction card will be only displayed on the Left side of your screen, centered on the screen height.
Example 2: Instruction Card Scale
- In our previous example, as you can see, we did not define the Scale option on the instruction card file name. Therefore, the instruction card will be scaled using the default value determined on RocketLauncherUI. The initial default value for the scale option is ScreenHeight, therefore, the IC image will be resized, keeping its aspect ratio, to fill the user screen height. This is a very good setup if you want to show only one instruction card each time on the side of the screen. If you want to have an IC with half of the screen height displayed, just add to the file name the special word "HalfScreenHeight", like in the following example:
Instruction Card - Ryu 1 - (bleasby) leftCenter HalfScreenHeight.png
- Just like the positions (that can be defined through adding specific words to the file name like leftCenter, rightCenter, and so on), the IC can be also scaled automatically by the bezel code to adjust to different screen resolutions based on special file name keywords, as can be seen in the example above.
- These keywords are: ScreenHeight, ScreenWidth, HalfScreenHeight, HalfScreenWidth, OneThirdScreenHeight and OneThirdScreenWidth.
- If you want to display the IC with a different proportion not defined on the ICS scale options (for example taking 80% of the screen height), just add some transparent area to the sides of your ICs image and try to use the default screenHeight scale whenever it’s possible.
Example 3: Multiple Players/Positions Instruction Cards
- Two Players Example:
- If the game supports two simultaneous players and the same IC could be used for both, just add the leftCenter and RightCenter positions on the same file name, and it will be used for the two players.
- For example:
Instruction Card - Ryu 1 - (bleasby) leftCenter rightCenter.png
Instruction Card - Ryu 2 - (bleasby) leftCenter rightCenter.png
Instruction Card - Ken - (bleasby) leftCenter rightCenter.png
- Four Players Example:
- If the game supports four players, just add the topLeft,bottomLeft,topRight,bottomRight to be able to show four ICs at the same time on screen.
- For example:
Instruction Card - Thor - (bleasby) topLeft bottomLeft topRight bottomRight.png
- To show four ICs at the same time on screen, set each of them to just use half of the screen height:
Instruction Card - Thor - (bleasby) topLeft bottomLeft topRight bottomRight HalfScreenHeight.png
- This way things will be plug and play for all users.
Instruction Cards Menu Names
- The ICs file name will define the name to be displayed on the menu.
- The bezel code will remove from the file name the word "Instruction Card", anything inside parenthesis, the position words (leftCenter, rightCenter,...) and the scale words (HalfScreenWidth,...). Everything else on the file name will be used as the instruction card name, so if you have this file name:
Instruction Card - Ryu 1 - (bleasby) leftCenter.png
- The red parts will be removed:
Instruction Card - Ryu 1 - (bleasby) leftCenter
- And you will get this as the menu name:
- Ryu 1 -
IMPORTANT:
- If no position special word is added to the instruction card file name, RocketLauncher will consider that the Instruction card should be shown in all positions defined on the RocketLauncherUI, general settings, positions option.
Advanced User Guide - Customizing The Instruction Cards Menu
- The instruction cards menus are defined by four files:
- IC Menu Left.png - Background image of the IC left menu
- IC Menu Left.ini - Options that define the ICs names list to be shown on the left menu
- IC Menu Right.png - Background image of the IC right menu
- IC Menu Right.ini - Options that define the ICs names list to be shown on the right menu
- You can simply create a new background file for the ICs menu, or edit the ini files to change the font and location appearance.
- The ini file has two main sections, the list settings ([Instruction Card List Settings]), which defines the list font, colors, size and position appearance options, and the text screen position ([Instruction Card Screen Position Text Settings]) that defines the text that shows the current selected IC position.
- In RocketLauncherUI you can also control the number of items listed at the same time on the ICs menu (7 ICs is the default number of items shown on the list), and the positions that will be controlled by each IC menu.
- RocketLauncher will filter out from the possible selection, any screen position that does not have at least one instruction card to be shown.