Difference between revisions of "Keymapper"
Kevinlives (talk | contribs) |
Kevinlives (talk | contribs) |
||
| Line 45: | Line 45: | ||
<br /> | <br /> | ||
The next step is to map your buttons to a keyboard key. This is simple and easy to do. You will need to click on one of the white boxes that represent your buttons on your controller. This will open a virtual keyboard. Choose your key. When you are finished mapping your buttons you can now save your profile. To use with HyperLaunch you will need to name it and place it in the correct folder path as described in the [https://sites.google.com/ profiles] section below. | The next step is to map your buttons to a keyboard key. This is simple and easy to do. You will need to click on one of the white boxes that represent your buttons on your controller. This will open a virtual keyboard. Choose your key. When you are finished mapping your buttons you can now save your profile. To use with HyperLaunch you will need to name it and place it in the correct folder path as described in the [https://sites.google.com/ profiles] section below. | ||
| + | <br /> | ||
| + | <br /> | ||
| + | <span id="desc"><span style="color: green;font-size: 150%;">'''<u>AutoHotKey</u>:'''</span><br /> | ||
| + | <br /> | ||
| + | AutoHotKey is the only free keymapper that is supported by HyperLaunch. The downside to using ahk as your keymapper is that HyperLaunch only has basic support for it and it does not support Front End or HyperLaunch Menu [https://sites.google.com/site/hyperlaunch2/home/features/keymapper#profiles profiles] or any other kind of in game remapping done by [https://sites.google.com/site/hyperlaunch2/hyperpause/features/the-controller-menu HyperPause]. There is no download required to use it, but if you wish to test your key maps without starting HyperLaunch you can download autohotkey from [http://www.autohotkey.com/ autohotkey.com]. To create an ahk profile, you will first need to create an ahk file. You can do this by creating a new Text Document and renaming the file extension from .txt to .ahk. Now open your new ahk file with your favorite text editor and start adding your remaps. You can find more info about how to remap via ahk [http://www.autohotkey.com/docs/Hotkeys.htm here]. A list of support ahk keys can be found [http://www.autohotkey.com/docs/KeyList.htm here]. Information on how to remap keys and buttons can be found here and more information on how to remap joysticks and controllers can be found here. Save the ahk file with the remaps as one of the profile names specified in the [https://sites.google.com/ profile section] below. As an example, let's say you want to remap a to b and c to d using ahk for the rom "Mario" for Mame. You would create a "Mario.ahk" in "Keymapper Profiles\Mame\" and in it you would find the following remaps: | ||
| + | <br /> | ||
| + | <br /> | ||
| + | Code: | ||
| + | <pre style="color: green">a::b | ||
| + | c::d</pre> | ||
| + | <br /> | ||
| + | <span id="desc"><span style="color: green;font-size: 140%;">'''<u>JoyToKey</u>:'''</span><br /> | ||
| + | <br /> | ||
| + | [http://www-en.jtksoft.net/ JoyToKey] is shareware and a license for a fully functioning version will cost $7, but a functioning trial version with few limitations can be downloaded for free. JoyToKey enables you to control many softwares (e.g. web games, browsers, office applications or even Windows itself) by using your favorite windows joystick. Whenever you press joystick buttons and sticks, JoyToKey will emulate keyboard strokes or mouse inputs based on joystick input so that the target application works as if you used a real keyboard or mouse. You can create multiple configuration files to switch across different key/mouse assignments. It also supports the automatic association with target applications so that the config file will switch automatically when the target application changes. You can download the latest version of JoyToKey from their website [http://www-en.jtksoft.net/ www-en.jtksoft.net]. JoyToKey is different from the other keymappers in the sense that the others require you to have a profile per player, but JoyToKey only requires you to have '''one cfg profile for all the players'''. In other words the multiplayer tag won't work on your profiles since the tags are inherent in joytokey's profiles. The way to differentiate between player 1 and player 2 is inside the joytokey menu and at the top you will see the tabs Joystick 1 and Joystick 2. '''Joystick 1 = Player 1''' and '''Joystick 2 = Player 2'''. JoyToKey supports up to 16 of these tabs. Be sure to change your settings so that you '''Start JoyToKey in a minimized mode''' and '''Hide icon from taskbar when minimized'''. A how to guide for basic usage and advance usage of joytokey is provided on their website [http://www-en.jtksoft.net/ www-en.jtksoft.net]. | ||
Revision as of 17:42, 7 April 2015
ONLY Xpadder (2012 versions) and JoyToKey (v5+) and Autohotkey scripts are supported options for keymapper functionality. Will not work with JoyToKey v3 or below.
Even though Keymapper supports 16 controllers, this only for Direct Input and not XInput since XInput is limited to 4 controllers. (Xinput is typically used in software that natively supports the 360 controller.)
| Contents
3 Preferred Controller |
Keymappers:
Xpadder:
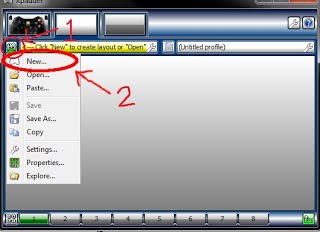
Xpadder costs $10 and can be downloaded from xpadder.com. This is the recommended keymapper of choice. To set it up, run it once you have downloaded it. Make note of where you have installed it to since you will need to know that when you use it with HyperLaunch. Once you have installed it, you will need to make a layout for your controller.
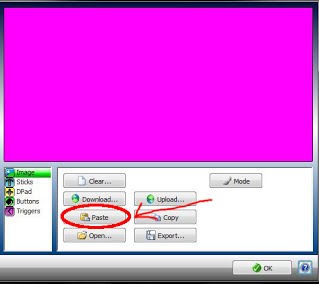
Images to replace the pink background can be found at xpadder.com/gcdb. An image of your controller will be useful for making your profiles. To grab an image from the xpadder database right click on the image you want and choose copy image. You can then use the paste button in xpadder. Now you will need to add your analog sticks, dpad, buttons and triggers using the on screen instructions Once you've finished adding all the controls for your controller you will need to save your layout. I suggest saving it as the same name as your controller (the default name).
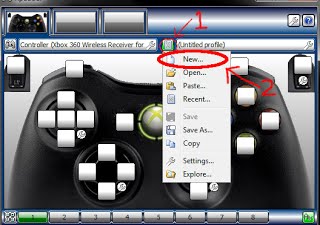
You will now need to create a profile. Profiles are what HyperLaunch uses to tell xpadder how to map your controller. You can start by making a profile by clicking on the text page button first and then choosing New.
The next step is to map your buttons to a keyboard key. This is simple and easy to do. You will need to click on one of the white boxes that represent your buttons on your controller. This will open a virtual keyboard. Choose your key. When you are finished mapping your buttons you can now save your profile. To use with HyperLaunch you will need to name it and place it in the correct folder path as described in the profiles section below.
AutoHotKey:
AutoHotKey is the only free keymapper that is supported by HyperLaunch. The downside to using ahk as your keymapper is that HyperLaunch only has basic support for it and it does not support Front End or HyperLaunch Menu profiles or any other kind of in game remapping done by HyperPause. There is no download required to use it, but if you wish to test your key maps without starting HyperLaunch you can download autohotkey from autohotkey.com. To create an ahk profile, you will first need to create an ahk file. You can do this by creating a new Text Document and renaming the file extension from .txt to .ahk. Now open your new ahk file with your favorite text editor and start adding your remaps. You can find more info about how to remap via ahk here. A list of support ahk keys can be found here. Information on how to remap keys and buttons can be found here and more information on how to remap joysticks and controllers can be found here. Save the ahk file with the remaps as one of the profile names specified in the profile section below. As an example, let's say you want to remap a to b and c to d using ahk for the rom "Mario" for Mame. You would create a "Mario.ahk" in "Keymapper Profiles\Mame\" and in it you would find the following remaps:
Code:
a::b
c::d
JoyToKey:
JoyToKey is shareware and a license for a fully functioning version will cost $7, but a functioning trial version with few limitations can be downloaded for free. JoyToKey enables you to control many softwares (e.g. web games, browsers, office applications or even Windows itself) by using your favorite windows joystick. Whenever you press joystick buttons and sticks, JoyToKey will emulate keyboard strokes or mouse inputs based on joystick input so that the target application works as if you used a real keyboard or mouse. You can create multiple configuration files to switch across different key/mouse assignments. It also supports the automatic association with target applications so that the config file will switch automatically when the target application changes. You can download the latest version of JoyToKey from their website www-en.jtksoft.net. JoyToKey is different from the other keymappers in the sense that the others require you to have a profile per player, but JoyToKey only requires you to have one cfg profile for all the players. In other words the multiplayer tag won't work on your profiles since the tags are inherent in joytokey's profiles. The way to differentiate between player 1 and player 2 is inside the joytokey menu and at the top you will see the tabs Joystick 1 and Joystick 2. Joystick 1 = Player 1 and Joystick 2 = Player 2. JoyToKey supports up to 16 of these tabs. Be sure to change your settings so that you Start JoyToKey in a minimized mode and Hide icon from taskbar when minimized. A how to guide for basic usage and advance usage of joytokey is provided on their website www-en.jtksoft.net.


